

How-To Make a Simple Leather Sunglasses Case

A quick and easy no-sew leather project for Summer!
Summer is right around the corner which means longer days and more sun! It also means expanding your sunglass wardrobe. It's easy to misplace them or scuff them in your beach bag, farmer's market totes, under your car seats, or even your back pockets.
This is such a simple leather project, you can make a case for every pair of glasses you own in one afternoon. Plus, if you're already handy around a craft room, you may have a number of the tools needed already. If not, they're inexpensive to pick up. So let's get started!

Here are the items you will need to make your case!
8"x10" Leather Pre-Cut. I used soft tempered, 2-3 oz thick leather. If you want more structure, go with a thin Vegetable Tanned pre-cut, 2-4 oz in thickness.
Leather Cement (I used Fiebings for this project, but if you want a heavy-duty bond, try Masters Cement)
Paint Brush (to apply glue)
Sharp pair of Scissors (make sure they are sharp)
Piece of thick scrap leather or cardboard.
Depending on how you want to close your case, you will need the following:
Line 20 Snaps (in the finish of your choice)
Plastic or Rubber Mallet (you'll need this for both the punch set and the snap setter)
-If you'd prefer not to use snaps or hardware:
Strand of Soft Temper Leather Lace or Leather Cord (in color and length of your choosing)
Small circular scrap piece or die-cut.
Utility Blade.
Beads (optional, depending on the finished look you want)
Gum Tragacanth (optional)
Let's get started!

Take your 8x10 pre-cut, and make two folds to create an envelope shape. Press down on your folds to make a crease. You should be able to see the creases as your reference point for where to apply your glue.

If you decide to make this with Vegetable Tanned leather, you will need to wet down your creases with water, so that the folds will smooth. Once those are wet, you'll need to clamp your leather so that the crease will dry into the leather. This step should not be done with soft tempered (chrome tanned) leather.

Using the crease lines for reference, apply a generous amount of glue with your paintbrush, on both sides of the pocket. Make sure not to go over the top crease on your leather as that is going to be your flap on your case. Don't go too wide with your glue, about 1/4" is more than enough without cutting into space for your glasses.

Once the glue is applied, let it settle for about 30 seconds. This will allow the glue to get tacky and help improve and strengthen its bond. Fold the leather over and make sure your edges match up evenly.
Apply pressure to the edges and clean away any glue that may overrun your sides. Set a heavy book on top of your case and let it dry for a short time. You could also roll over it with a rolling pin or bone folder. However you prefer, you will want to keep the pressure on the seams while they dry!
Fiebings Cement is quick drying. Mine set up in about 10 minutes allowing me to continue on with the project fairly quickly. If you feel more comfortable with waiting longer, go for it! You now have what clearly looks like a case!

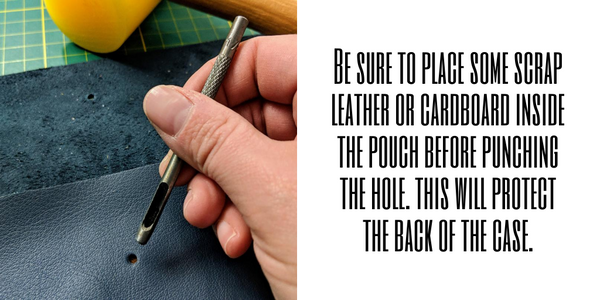
If you want to fasten your case with a snap, start reading here (if you don't want to use snaps, skip down)! You will want to take a scrap piece of leather or a piece of cardboard and place it inside the pocket to protect the leather over these next few steps.

I decided that I wanted to have the snap centered on my case (but you can certainly place more than one on either side, it's up to you). Use a ruler to find your center point.
With my scratch awl, I gently poked a hole through the flap and the first layer of the case to mark where I will later punch my holes for the snaps. This will ensure the snaps line up.

With my awl marks clearly visible, I laid the top flap out and lined up my leather punch (I used the 1/8" punch for this part). Using the mallet, hammer it through the leather. If you'd like to see how to use these punches, click here!
Moving on to the body of the case, you will need to punch a hole here as well. Again, make sure to have that thick piece of leather or cardboard inside the case so that you do not punch through the other side.
Now it's time to set your snap hardware. Unsure about setting a snap? Click here to watch a quick video on snaps.

Make sure the smooth cap is on the outside of the flap. Hammering too hard or aggressively can warp the smooth side on the snap. You can place a thin piece of cloth between the cap and the anvil if you are worried about warping your snap cap.
Now place the anvil inside the case on your cardboard or scrap and set the other half of you snap.

Once both pieces feel set and sturdy, snap them together and you have a completed case!

You can also add some finishing details at this point. I rounded the edges, but you can leave them square, or add a decorative edge to the entire flap.

If your corner trimming has left your corners looking a little ragged, you can apply some gum tragacanth on the corners to smooth them out.
Maybe you don't care for the look of snaps, or maybe you don't feel comfortable setting hardware. Whatever the case, you can also make your own closure with lace, cord, or ribbon. Make it as long as you want to wrap around the case as many times as you would prefer. Follow all of the same steps as above, until you have the envelope shape. Then jump to these next steps.

Again, I chose to put my closure in the center of the case. I laid out the top flap and punched a hole using the 7/32" punch. I flipped the case over and glued down a circular piece of leather over the punched hole. This will help the leather maintain its shape when I run the lace through the hole. If you are using a stiffer leather, you can skip this step.
Use the first hole you punched to punch through the circular piece in the same place.

For this case, I added a little more decorative edge. Using the bottom of a glue jar, I cut my leather into a clean half circle. Again, use a sharp utility blade, or mark the leather with a pencil and cut it with your scissors. Now you're ready to run the lace through your case flap!

Cut your lace the length that works best for you. Make a loop in the center of your lace and push it through the hole from the outside in. Pull enough of the lace loop through that it reaches over the edge of the flap.
You are going to pull the rest of your lace through the center of your loop and tighten it. I added beads to the end of my lace for a little more flair. This helps to weigh down the lace and keep it in place once I wind it around the case to close it. Pull the lace and beads under and over the case, and you are done!

These are a fun project because you can really customize these however you see fit. You could cut the flap on a diagonal. Add rivets to the edges to add a little more interest and to reinforce the seams. Use the leather punches to add shapes and designs. Use some Angelus paint or Glitterlites to customize your case even more. You could even buy a 12"x12" pre-cut and go through the same process to create a clutch!
Did you make a case or a similar DIY project with our leather? Share it on social media and tag us with #theleatherguymn so we can see your work!